Thursday, December 20, 2007

Ruby Screenshot of the Week #25: require_gem

WARNING: This blog entry was imported from my old blog on blogs.sun.com (which used different blogging software), so formatting and links may not be correct.


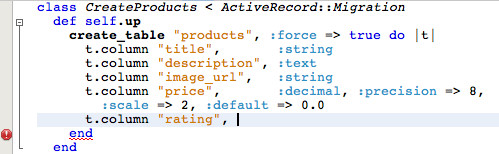
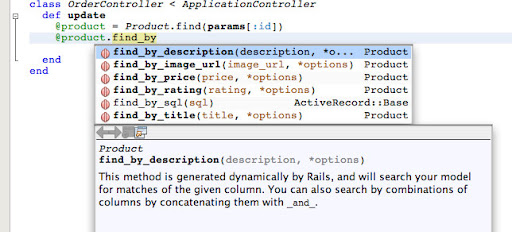
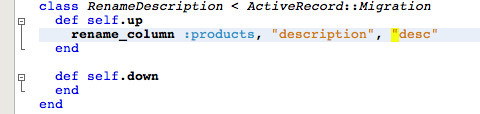
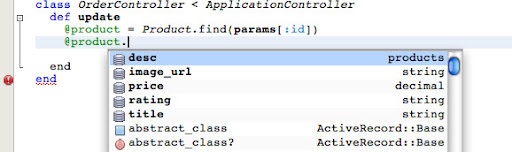
There have been a number of releases lately. Rails 2.0 shipped. NetBeans 6.0 mostly supports it. There were a couple of changes, such as the scaffold generator's parameters changing meaning, and the new shorthand migration syntax, which affected NetBeans. I've committed changes to 6.1 to support these, so grab the latest if you're wanting complete Rails 2.0 support. However, note that we're in early 6.1 development so there's some big potentially destabilizing changes, such as a new platform manager which lets you choose per project ruby interpreters, configure separate gem repositories and so on. I'll post more about this when it's done. You don't need to upgrade if you're just wanting to use Rails 2.0 - nearly everything in NetBeans 6.0 works just fine.


JRuby 1.0.3 also recently
shipped, and I've just updated NetBeans 6.1 to use it. JRuby 1.0.3 lets you run Rails 2.0 without needing to install the optional jruby-openssl gem.


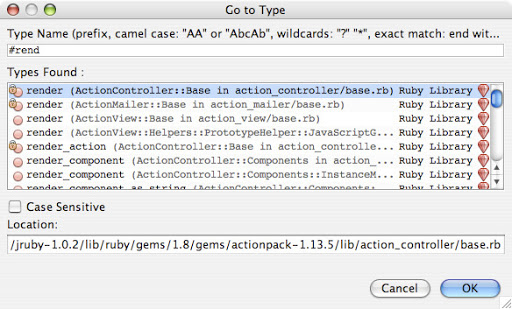
I just noticed that RubyGems 1.0 has
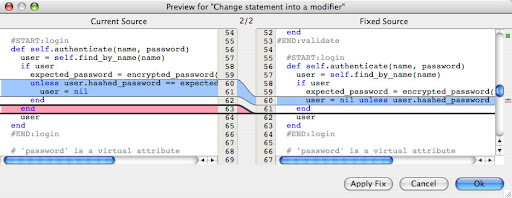
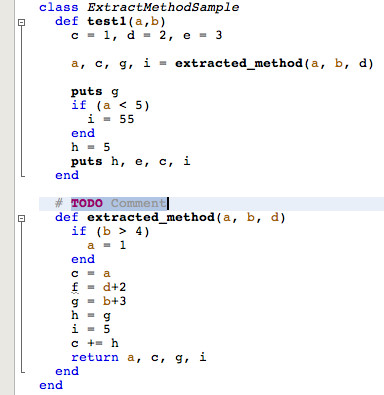
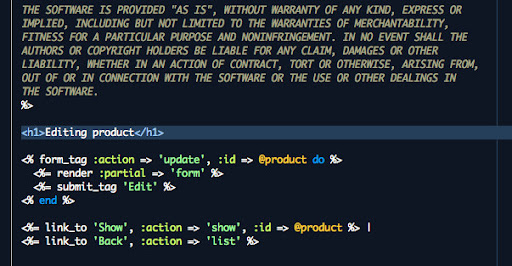
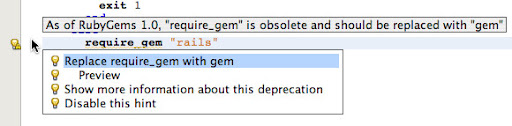
shipped. One of the changes in RubyGems is that the require_gem method, which has been deprecated for a while, is now gone - so you have to update your code appropriately. require_gem was used by previous versions of Rails, so many boot.rb files still reference it.


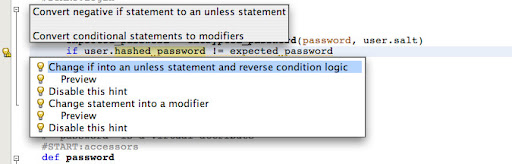
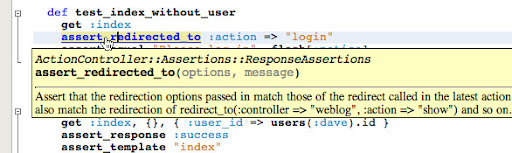
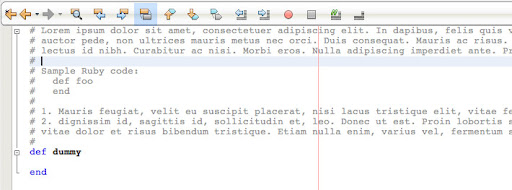
I just added a checker for this:


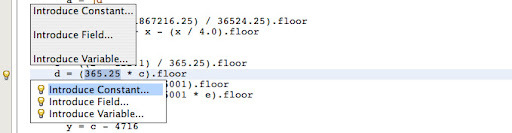
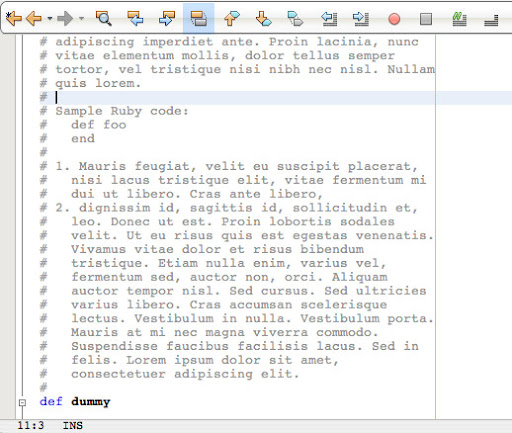
It's not just a warning - it's a quickfix:


The "Show More information" fix opens the browser on the release page for RubyGems 1.0 which briefly mentions the require_gem removal. If anyone has a better URL to an official and mostly permanent page (e.g. preferably not somebody's blog) discussing this change, I'd appreciate the link.


Ruby 1.9 is getting closer. Charlie recently
pointed out to me that they recently
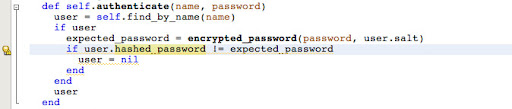
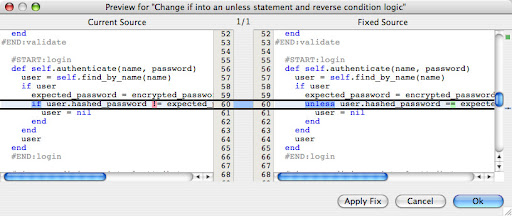
decided that retry statements will as of Ruby 1.9 only be allowed inside
rescue blocks. Thus, we now have a hint to look for problems of this sort.


If anyone has
any ideas for other Ruby 1.9 migration issues, please
let us know!


Finally, let me end with a couple of links. The "Off The Line" blog has posted
cheatsheets for the NetBeans Ruby support, PDFs that summarize key shortcuts and other hints. And Michael Slater, one of the early adopters of the NetBeans Ruby support, will be offering a Rails Seminar in a couple of months, which is going to be using NetBeans. W00t!


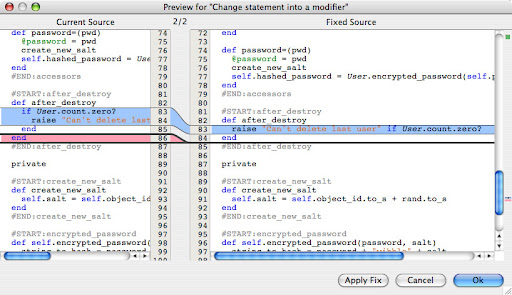
Updated a few hours later: Dr. Nic pointed out that require_gem can't
just be replaced by gem and showed me how the code needs to be morphed. I've updated the
quickfix to do The Right Thing now - thanks Dr. Nic!


Monday, December 3, 2007

Ruby Screenshot of the Week #24: Quick Fix Previews

WARNING: This blog entry was imported from my old blog on blogs.sun.com (which used different blogging software), so formatting and links may not be correct.


First of all, NetBeans 6.0 (final) was released this morning. Go get it!


So let's talk about 6.1 :) I just updated the quickfix infrastructure such that we can automatically generate previews for how the hints will modify the source. I've also added some new hints.


Let's start looking at the user.rb file in the sample Depot application. If I place the caret inside one of the if blocks, a lightbulb appears:


NetBeans offers to replace this if-block with one where the "if" is a statement modifier. This idea came from the excellent "Exploring Beautiful Languages"
blog
by Luis Diego Fallas, where he implements NetBeans Ruby hints -- in Scala!


Here's the new preview functionality in action; instead of just applying the fix I invoke the Preview and get the following dialog which shows what the fix will do:


Preview is particularly useful for larger source changes like Extract Method.


Here's another method from the same file:


Obviously, we can apply the same "convert to statement modifier" here, but look at the first suggested fix:


NetBeans will convert "if negative condition" to "unless", and "unless negative condition" to "if" to make the code more readable. This was also shown by Luis in his blog entry. Here's the proposed fix:


and we can apply the other conditional cleanup as well to end up with a much simpler statement:


There is one more recently added hint: Check for accidental assignments.


At first I got a lot of false positives for this hint, since many Ruby programmers seem to like to intentionally assign in their conditions. But then I updated the rule to only complain if the variable being assigned to had already been seen in this scope, and that seems to do the trick perfectly. Newly assigned variables are intentional side effects of the assignment, and assignments to existing variables are likely bugs and should be avoided.


Wednesday, November 21, 2007

Quick Hi

WARNING: This blog entry was imported from my old blog on blogs.sun.com (which used different blogging software), so formatting and links may not be correct.


No screenshot-of-the-week this time; I'm taking the week off since the kids are out of school for whole the week. I'm having a lot of fun!


Meanwhile, Cindy Church has been busy creating more demo videos on netbeans.tv:
First, there's the classical

weblog tutorial
,
and then there's showing how to

write and run unit tests
in the IDE (where I'm incidentally also
using the Dark Pastels color theme I've discussed previously on this blog). We recently met and
recorded more material, so there are more screencasts in the pipeline. P.S.: Both screencasts are also available in higher definition as downloadable Quicktime files - see the "QuickTime format of this screencast" hyperlinks near the bottom.


Ok, back to vacation!


Monday, November 12, 2007

Ruby Screenshot of the Week #23: Extract Method and More Refactorings!

WARNING: This blog entry was imported from my old blog on blogs.sun.com (which used different blogging software), so formatting and links may not be correct.


Last week I promised to catch up on my e-mail, but I had been missing feature work too much during the bug phase so I put it off for a week... to implement some more quickfix refactorings:


  • Extract Method

  • Introduce Variable

  • Introduce Constant


Here's how it works. Let's start with "Extract Method". You're looking at some code like this:


You decide there's too much going on in this method, and you want to pull the middle section into
its own method. Select it, and notice the lightbulb which shows up on the left:


Press Alt-Enter to show the quick fix alternatives:


Select Extract Method, and the IDE will pop up a dialog asking you for the name of the new method you want to extract from the selected code fragment:


Press OK (or just hit Enter), and the code will mutate into the following:


There's a lot to notice here. First, there's a new method, and the active selection and caret is on a comment for that method (so you can just type to replace it). The new method is added below the one you extracted code from. And the most important part about this refactoring is that the IDE figures out which variables to pass in to the method, and which variables to pass back out:


  • a, b and d are accessed from within the fragment, so they are passed in.
  • c is reassigned in the fragment without reading the previous value, so
    doesn't need to be passed in.
  • f and h are assigned locally inside the extracted fragment, but are not read
    outside of it, so do not need to be passed back out
  • g is assigned inside the fragment, and read later outside, so it is returned
    from the new method but not passed in
  • h is assigned inside the fragment, and is read later, but it is assigned
    before this read access so the value doesn't need to be passed back
  • i is also assigned inside the fragment, and -may- be read after the fragment,
    so it too is passed back out


Ruby's multiple return values makes this refactoring much cleaner than in Java where you have
to jump through some hoops to extract code fragments that modify multiple local variables...


Now let's take a look at Introduce Constant. Let's say you're looking at code like this (unlike the above contrived example from one of my unit tests for Extract Method, the following is from
the standard Ruby Library's Date class):


There are a lot of "magic" numbers here. I honestly don't know what some of them are - but I recognize 365.25 as the number of days per year. Let's make that clearer - select that constant. (Tip - just move the caret to it and press Ctrl-Shift-Dot, which selects progressively larger logical elements around the caret). This produces the above lightbulb, so let's press Alt Enter again:


I can now choose to either introduce a field, or a variable, or a constant. A constant is most natural here. (You won't be offered constant if the selected code fragment is not a constant expression.) So choose Introduce Constant:


In the dialog asking for the name of the new constant, notice that it also detected some duplicates of this constant in the same class (3 of them to be exact), and asks if you want to replace all of them. I do - so I select the checkbox and press Ok:


The IDE has inserted a new constant at the top of the class, and has warped to it to let me edit a comment for the constant. I can also scroll down and see that the constants below were updated:


The search for duplicates only looks for single constants at the moment, not more complicated expressions - it will do that soon. As always, please report any bugs you encounter. This is in the daily 6.1 trunk builds, although I've deliberately kept the code 6.0 compatible such that I can put this out on the update center for 6.0 as well.


Monday, November 5, 2007

Ruby Screenshot of the Week #23: Open Type and Open Method

WARNING: This blog entry was imported from my old blog on blogs.sun.com (which used different blogging software), so formatting and links may not be correct.


As of 20 minutes ago, NetBeans 6.0 entered high resistance, meaning that from this point on, only critical "showstopper" bugs will be addressed. We're spinning a release candidate in a a week, and after repeating that once or twice, NetBeans 6.0 will be done!


It's been a long sprint getting to this point, including last minute bug fixing. We took the kids to the waterfront in Berkeley yesterday where they had a blast with bugs while I blasted bugs (see picture on the left).


My e-mail inbox has been suffering the last couple of months. On the right is a snapshot of the sidebar in my Mail tool - the numbers listed next to each folder is the number of unread mail in that folder... As you can see, the number of unread mails addressed directly to me is a lot lower than in other categories (such as commit bug report mails) but even there I'm a bit behind.
Now that 6.0 is winding down I can hopefully catch up on some of it - and apologies to those of you with e-mails in that pile. At least you know it's not a personal insult!


Let's get to some Ruby screenshots. One thing I fixed this week was some bugs around the "Open Type" dialog (Ctrl-O, or Command-O on the Mac). I finally made "CamelCase" navigation work properly not just for classes but for module qualifiers as well, so if you for example want to open ActionController::Base, just type AC::B:


If you had typed AV instead it would have shown ActionView instead of ActionController, and so on.


Another thing I fixed is the ability to specify a specific method in a class - just use "#" as in rdoc to specify Class#method, or omit the class to search across all classes. Let's jump to methods starting with rend such as Rails' render:


Or how about the to_xml methods - but only in modules that start with "A":


You can also use wildcards. Here's all methods that contain load somewhere in the name:


P.S. There are still some bugs around being able to use camel case and regexps when filtering methods - I'll address those in the first update release.


Friday, October 26, 2007

Ruby Screenshot of the Week #22: Go To Specific Location

WARNING: This blog entry was imported from my old blog on blogs.sun.com (which used different blogging software), so formatting and links may not be correct.


It's bugfixing all the way these days - I apologize for being behind on my e-mail. We're freezing 6.0 pretty soon (in eight days), so I'd really like to get some help testing the last minute fixes. More about that shortly. But first, some screenshots.


One longstanding bug we've had is that our "Go To Declaration" (holding the Ctrl or Command key down while clicking on classes or methods) would jump to a different place than you were intending. With Ruby's open classes, there are many definitions for a class, so if you want to jump to say the File class, did you want the one in ftools.rb? Or perhaps in pp.rb? We have some heuristics which pick which reference is "best" - it involves looking at things like whether each declaration has documentation, whether it's directly loaded by your file using require statements, and so on. But this can never be perfect. So, to solve this problem, Go To Declaration clicks (or Ctrl/Command-B) will now pop up a dialog when there are multiple possibilities. As before, one item is NetBeans' best guess - and it's shown first and in bold. All you have to do is press Enter or click on it to jump as before. But other matches are shown too, in a sorted order. First are the documented entries, and at the very end, :nodoc: entries (shown with
a strikethrough font effect).


Here's how this look if you for example try to jump to TestCase:


If you don't like this behavior, you can always turn it off by running NetBeans with


-J-Dgsf.im_feeling_lucky=true


This was added just this week. Something related which has been there for a while is documentation
tooltips. If you're holding the hyperlink-modifier key (Ctrl/Command) and hover over methods and
classes, it will display a tooltip with the type of the symbol and its documentation. For example,
in a Rails controller test, here's what I got:


I just (a few hours ago) checked in a bunch of changes to clean up how NetBeans handles the gem load
path. It should now finally handle $GEM_HOME properly, as well as vendor gems and in particular, vendor/rails. Thus, the active record completion I showed last week
should now work with Rails 2 and edgerails. NetBeans should properly pick gems both from the current project as well as the current gem root (based on which gem version is higher). However, all of these changes were a bit involved... So I would really appreciate if people could grab the current bits (build 4866 or later from http://deadlock.netbeans.org/hudson/job/ruby/) and take it for a quick spin. Make sure that code completion etc. picks up your gems as before. You may have to wipe out the cached indices (userdir/var/cache/) if you have any problems. Don't worry, it's always safe to wipe out stuff inside var/cache.) If there any problems, please let me know now since we're about to freeze for 6.0.


P.S. Beta 2 was released this week - download,
New And Noteworthy


Tuesday, October 16, 2007

Ruby Screenshot of the Week #21: ActiveRecord Completion

WARNING: This blog entry was imported from my old blog on blogs.sun.com (which used different blogging software), so formatting and links may not be correct.


Let's jump to the good stuff right away:


Okay, now let's motivate it. Let's say you're writing a migration:


Hmm, what's the second parameter to the column method again?


Ah yes, the column type. Notice how the RDoc for the method call surrounding
the completion point is shown above - and perhaps more importantly, the symbol alternatives for
the current parameter are also
proposed below. Let's choose one.


Ah yes, the third parameter - the options. Again the documentation is
shown above (I've cropped it in this image) where you can read the details -
but many of the alternatives are listed here. Let's choose the :null hash key.


The parameter completion support I've shown here isn't specific to ActiveRecord. Let's say you're in
an ERB file and calling into say the NumberHelpers:


Anyway, we're done editing the migration. Now let's jump over to a controller file and reference the Product model that is using the database table for this migration. Let's ask for completion on the @product field that was just populated with a Product object:


The icon should make it really clear that these attributes are coming from the database as opposed to some dedicated attribute code in the Product implementation. Notice how NetBeans also shows the type for each of the columns. Completion also works for the dynamic finders that Rails generates. Let's ask for completion on find_by (this also works for find_all_by):


NetBeans offers code completion for models by examining the migration files. Let's go create another one. Here's
completion again, this time completing on the table name argument to rename_column:


Let's say we rename the description column to desc:


If we now invoke code completion in the controller again, notice how the Product attributes correctly
reflect the result of combining the migrations:


NetBeans will also use the schema.rb file that Rails will automatically generate if you run the db:schema:dump Rake target. This is useful if your migrations are doing creative things that NetBeans can't figure out, or if you're renaming tables (which NetBeans doesn't model right in this release.) With a schema dump file, not only does NetBeans have to do less work to figure out your migrations, its format is predictable such that the code completion should be completely accurate.


P.S. This doesn't work right if you freeze Rails into your project; you need to be using Rails via Rubygems. I'll fix that soonish.


Monday, October 8, 2007

Ruby Screenshot of the Week #20: Purdy Colors!

WARNING: This blog entry was imported from my old blog on blogs.sun.com (which used different blogging software), so formatting and links may not be correct.


A lot of people have asked for a "dark color theme" for NetBeans, possibly because there are several attractive dark color schemes for TextMate, a favorite editor among many Ruby developers. Jerrett Taylor has designed and contributed a great dark color theme for NetBeans, "Dark Pastels". I've wrapped it up as a plugin. As of today, it's prebundled with the continuous builds on http://deadlock.netbeans.org/hudson/job/ruby/, but for other versions such as beta1 and the upcoming beta2, you can download the plugin from here and install via Tools | Plugins (go to the Downloaded tab). It should hopefully also appear on the Auto Update center pretty soon.


To switch to this color theme after installing the plugin, open the options dialog, go to "Fonts and Colors" and choose the "Dark Pastels" color theme.


Let's get on to the screenshots! Here's a Ruby file:


...and here's an RHTML file:


Note that the plugin only replaces the editor colors. Other windows such as the navigator and project views keep the general look and feel of the whole application, so you can either slide these off to the side, or install a custom look and feel with colors more to your liking.


Here's what the plugin looks like in the Plugin Manager. As you can see I've named it "Extra Themes" such that it can hold several optional themes, so if you've got a color scheme to share, please do!


A huge thanks to Jerrett!


P.S. The theme the font to "Monaco", which is available on the Mac. If you're on a different platform you may want to go a tweak the default font to one that looks good on your system.


Tuesday, October 2, 2007

Disable Crashing...

WARNING: This blog entry was imported from my old blog on blogs.sun.com (which used different blogging software), so formatting and links may not be correct.


If you're on OSX, and you've experienced NetBeans 6.0 beta crashing on you, read on...


Right before beta1, we tweaked some of the Java VM startup flags NetBeans uses. In particular, we switched to the "Concurrent Mark Sweep" (CMS) garbage collector, which has a nice performance profile for IDE usage, since collection happens mostly in parallel so you don't get noticeable pauses.


Unfortunately, it turns out that these flags cause a lot of problems on OSX. In particular, they cause frequent virtual machine crashes!


Knowing this, for beta2 we've turned off those flags when running NetBeans on OSX. But that doesn't help you if you're trying to run beta1... Luckily, it's easy to fix it yourself, since the VM parameters are specified in a text configuration file.


First, open the netbeans.conf file. On my Mac, I installed NetBeans in Applications under NetBeans, so the file is


/Applications/NetBeans/NetBeans\ 6.0\ Beta\ 1.app/Contents/Resources/NetBeans/etc/netbeans.conf

The file contains this:

# Options used by NetBeans launcher by default, can be overridden by explicit
# command line switches:
netbeans_default_options="-J-client -J-Xms32m -J-XX:PermSize=32m -J-XX:MaxPermSize=200m
-J-Dapple.laf.useScreenMenuBar=true -J-XX:+UseConcMarkSweepGC -J-XX:+CMSClassUnloadingEnabled
-J-XX:+CMSPermGenSweepingEnabled
"
# (Note that a default -Xmx is selected for you automatically.)

# For JVMs which does not support Concurrent Mark & Sweep garbage collection
# algorithm remove "-J-XX:+UseConcMarkSweepGC -J-XX:+CMSClassUnloadingEnabled
# -J-XX:+CMSPermGenSweepingEnabled" part of options
# (see http://wiki.netbeans.org/wiki/view/FaqGCPauses)


Remove the bold section above; in other words, remove these 3 flags:


-J-XX:+UseConcMarkSweepGC -J-XX:+CMSClassUnloadingEnabled -J-XX:+CMSPermGenSweepingEnabled

Now when you restart the IDE should behave better.


Wednesday, September 26, 2007

Ruby Screenshot of the Week #19: Comment Reformatting

WARNING: This blog entry was imported from my old blog on blogs.sun.com (which used different blogging software), so formatting and links may not be correct.


I've been working on beefing up the RHTML support this week, but since I'm not done yet I'll talk about that next week. Instead I'll show you a feature that's actually in beta1, but you may not be aware of.


Let's say you have this code:


Have you ever wondered what the vertical faint red line on the right hand side of the editor is? It's the soft text limit line. It's telling you that beyond this line, you're going over 80 characters. There's nothing magical about 80 - you can configure it to something else, as I have done here, but more on that later.


Anyway, this comment is obviously not pretty since I've pasted in some text with long lines. This happens to my comments all the time after I edit them, removing a sentence here or adding another there.
But let's get to the point. Place the caret somewhere in the comment (as I have done). Now press Ctrl-Shift-P (on OSX, Command-Shift-P). Voila - the paragraph gets reformatted:


Notice that the IDE understands RDoc conventions. It has left preformatted code alone, and has recognized the numbered list and has formatted it appropriately. (There's also a hidden mode you can enable such that it reflows the current paragraph automatically as you edit comments.)


You can configure the text limit line in the general editor options - it's called "right margin":


One other interesting thing you can do with comments is view how RDoc will format them. Just use the normal "show documentation" gesture (Ctrl-Shift-Space, or Command-Shift-Space, to show the documentation for the symbol under the caret). This normally shows the documentation for a class or method that your caret is pointing to, but inside a comment, this will show the comment itself rendered rdocily:


That can be handy to check your docs as you're editing them (although this wasn't working properly in beta1, so get a daily build). The above example doesn't contain a lot of interesting rdoc markup, but let's say you brought this up on for example the form_tag method, you'd see something like this:


Notice how some of the code fragments are syntax highlighted as well - this is taking advantage of the enhanced rdoc rendering I've described earlier. And when tweaking your documentation, don't forget spell checking!


Finally, the above comment screenshots are a bit boring. Inline use of rdoc tags are also syntax highlighted. We were just discussing the meanings of the various colors on
dev@ruby.netbeans.org, and the following screenshot shows the meanings of the various syntactic constructs. Notice how rdoc tokens like :nodoc: and words surrounded by underscores are highlighted: